High Speed Communication
In this tutorial, we will show how to configure your ORCA motor and your code in order to achieve high communication rates.
We begin with the following source code:
#include <iostream>
#include "actuator.h"

using namespace orcaSDK ;

int main() {
	Actuator motor;

	int serial_port;
	std::cout << "Please input the serial port number of your connected motor. ";
	std::cin >> serial_port;

	motor.open_serial_port(serial_port);

	while(true)
	{
		std::cout << "Current Position: " << motor.get_position_um().value << "          \r";
	}

	return 0;
}
from pyorcasdk import Actuator

motor = Actuator()

serial_port = int(input("Please input the serial port number of your connected motor. "))

motor.open_serial_port(serial_port)

while True:
	print("Current Position: " + str(motor.get_position_um().value), end="        \r")
Viewing Communication Rate
For this tutorial we’ll be using IrisControls to access the motor’s build in GUI both to view its performance and to configure it as we’d like. First, connect your motor to IrisControls, then try running this tutorial’s sample code. Look in the status bar at the top of your connected IrisControls window. The “Modbus Rate” parameter should be reading somewhere between 60-80 Hz.
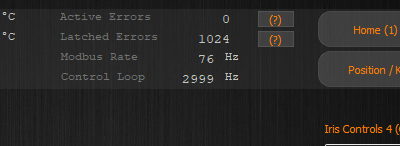
This is your communication rate, how many messages are going from your application to your motor and back within a second.
Configure Your Communication Parameters Through IrisControls
The parameters that we’ll need to update to allow for higher communication rates can be found on the modbus page. Select the button titled “Modbus”. We’re looking for the parameters “Def. Baudrate” and “Def. Interframe”, which can be found in the section “Modbus Options”.
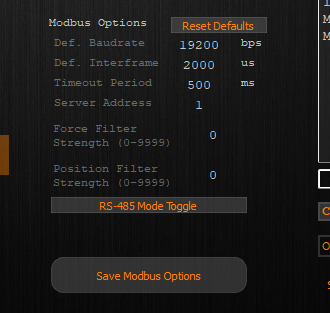
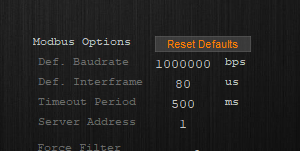
The Baudrate parameter determines the Baud Rate for the motor. It determines how rapidly the motor will transmit signals, or bits. A higher number here increases the rate of communication. The Interframe parameter determines how long the motor will wait at a minimum before returning a response. A lower number here will increase the rate of communication. We’ll update the parameters to 1000000bps baudrate and 80us interframe.
Note
These new parameters can be saved between power cycles by clicking the “Save Modbus Options” button below the parameter list.
Don’t forget that your baud rates might not match if using other tutorials after this one!
Configure Your Communication Parameters in the Code
We can’t simply update the parameters in the motor and expect communication to work. An important feature of baud rate in particular, is that not only does it influence how rapidly the transmitter sends signals, it also influences how rapidly the receiver expects signals. This is to say that the code should have matching parameters to your motor’s configurations. These parameters are added during your call to Actuator::open_serial_port().
...
motor.open_serial_port(serial_port, 1000000, 80);
...
...
motor.open_serial_port(serial_port, 1000000, 80)
...
At this point your configurations should match. Try running the code again. If everything is working well, your new communication rate should be somewhere close to 1000Hz.
Complete Example
#include <iostream>
#include "actuator.h"

using namespace orcaSDK ;

int main() {
	Actuator motor;

	int serial_port;
	std::cout << "Please input the serial port number of your connected motor. ";
	std::cin >> serial_port;

	motor.open_serial_port(serial_port, 1000000, 80);

	while(true)
	{
		std::cout << "Current Position: " << motor.get_position_um().value << "          \r";
	}

	return 0;
}
from pyorcasdk import Actuator

motor = Actuator()

serial_port = int(input("Please input the serial port number of your connected motor. "))

motor.open_serial_port(serial_port, 1000000, 80)

while True:
	print("Current Position: " + str(motor.get_position_um().value), end="        \r")